Testing With Charles Proxy Part 1
I find one of the hardest things about testing with a new tool, is actually getting started; familiarising myself with the new tool.
In the past, I’ve written about how to set up a proxy on Charles, so you can test other devices on your local dev machine
In this series of blog posts, the goal is to help someone get started testing with Charles Proxy.
The series will cover:
- What is a Proxy server?
- What is Charles Proxy and what can it do?
- How to set things up ready for testing?
- Test ideas using Charles including editing requests and responses, using breakpoints, throttling bandwidth, trigger various error codes and viewing network traffic.
This blog post will cover:
- What is a Proxy server?
- What is Charles Proxy and what can it do?
- How to set things up ready for testing?
What is a Proxy server?
“A proxy server is a server application that acts as an intermediary between a client requesting a resource and the server providing that resource.”
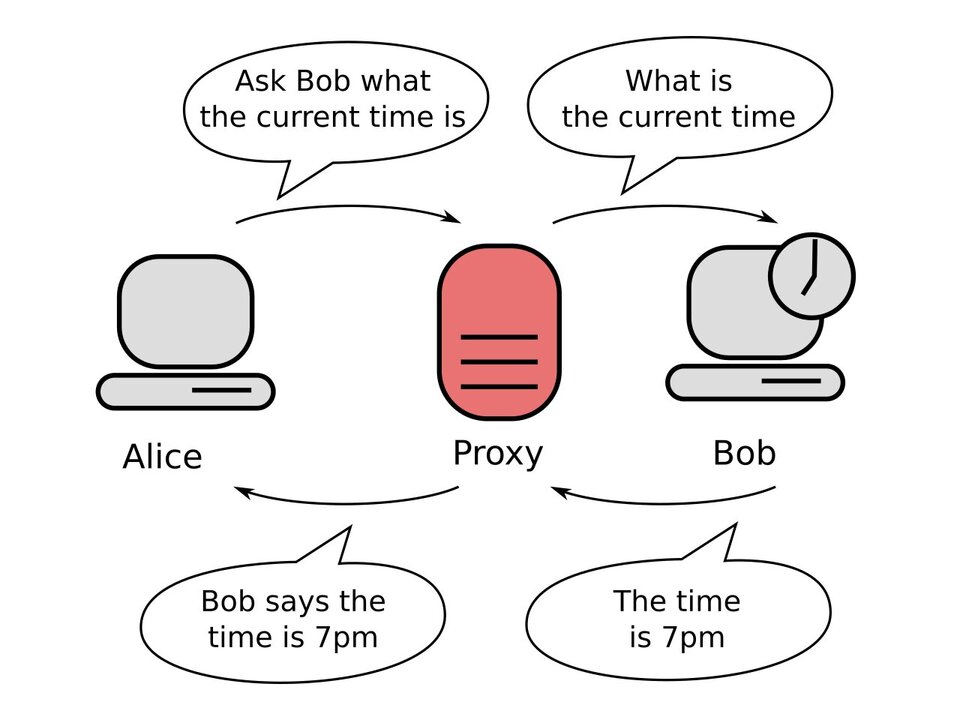
(By H2g2bob - Own work, CC0, https://commons.wikimedia.org/w/index.php?curid=16337577)
In the image above, Alice is the client requesting a resource (in this case “what the current time is”) and Bob is the server providing the resource.
The proxy is the red server in the middle.
Charles Proxy is such an example.
Another way of looking at proxies is to look at in terms of “in behalf of”.
Here’s an example:
At Toastmasters we have these annual meetings where we need to vote in a new board for a club including a president, treasurer etc.
You can vote in person.
Or, you can assign a proxy and that person would vote on your behalf.
That person would be the red server in the middle.
What is Charles Proxy and what can it do?
According to their site:
“Charles is a web proxy (HTTP Proxy / HTTP Monitor) that runs on your own computer. Your web browser (or any other Internet application) is then configured to access the Internet through Charles, and Charles is then able to record and display for you all of the data that is sent and received.”
As per their site, here are the key features:
- SSL Proxying – view SSL requests and responses in plain text
- Bandwidth Throttling to simulate slower Internet connections including latency
- AJAX debugging – view XML and JSON requests and responses as a tree or as text
- AMF – view the contents of Flash Remoting / Flex Remoting messages as a tree
- Repeat requests to test back-end changes
- Edit requests to test different inputs
- Breakpoints to intercept and edit requests or responses
- Validate recorded HTML, CSS and RSS/atom responses using the W3C validator
I will focus on the features in italics.
How to set Charles Proxy up for testing
A few things to note before we get started on set up:
- The following screenshots and these steps will be for a Mac, but as I understand it, it is very similar for Windows
- You can use a free trial of Charles for 30 days
- During this trial, you can only use Charles for 30 minute increments before it restarts (I think this was done to be purposefully annoying - to ensure people are evaluating Charles to see if they should buy it and not just using the tool for free)
- We will be using this test website to learn how to use Charles Proxy
- The test website will show a warning asking if you are sure you want to use the site (be careful of any input you put in here, don’t use one of your passwords as the test password on this site)
-
Download Charles here and drag the app to your Applications folder
-
Open up Charles then Install the Charles Certificate by going to Help > SSL Proxying > Install Charles Root Certificate

-
Next, go to Keychain access (you can do this from the Spotlight menu) and then on the All Items category, with “login” keychain, search for “Charles”.
-
Once you have found the “Charles Proxy CA” certificate, you should see that it’s got a red X icon indicating it’s not trusted. Right click on this row and then select “Trust Charles Proxy”
-
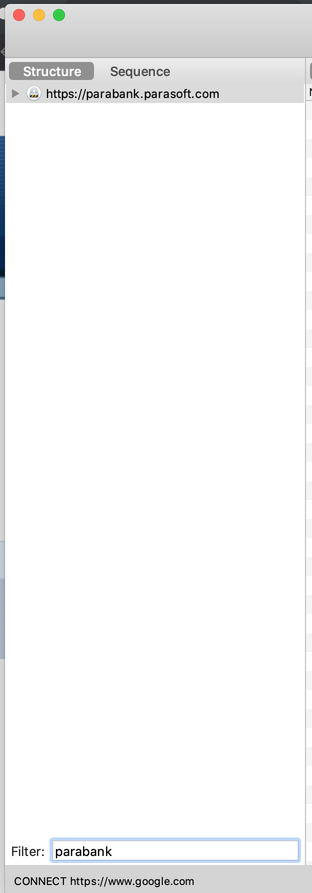
Now go back to Charles, we will now set a filter so we will only see traffic going to and from our test website (we want to ignore the “noise”). Search for “parabank, then switch to the sequence tab.
-
We will now set the SSL Proxying settings so we can view the network traffic going to and from our test website in plain text.
-
Go to Proxy > SSL Proxy Settings.
-
In the SSL Proxying tab, click on the “Add” button. Type: parabank.parasoft.com in the Location field then click OK.
-
Tick the Enable SSL Proxying checkbox
-
Test that your set up was correct by registering an account here. You should be able to see the request in plain text when you are on the Sequence tab, tap on the POST request, then switch to the Contents tab.
The request is the registration information you just submtited in the UI, including your first name, address, city etc.
In the next post, we’ll focus on:
- Test ideas using Charles including editing requests and responses and using breakpoints
Testing with Charles Proxy Part 2
Let me know how setup went for you - you can reach me on Twitter: @NicolaLindgren
#How-To #Popular #Testing